2-2-14 WARNING: the tater bag that Vera made for me caught on fire in the microwave the other day after several successful uses. yikes! Some of the experts told me it could've been that there was something that wasn't 100% cotton in it (thread, batting, etc), or there could've been a little food on it. Sooooo, never leave unattended! Microwaves are also different -- some hotter than others.
1-15-14: The girls made Tater Bags today in crafts at JCRV. Last year Cliff was going to give us a demo in crafts for this, but we ran out of time. One of my workamper friends in Branson, Vera from Michigan, gave me one along with the pattern a couple of summers ago. So this year my winter peeps and I got together and made them. A huge shout out to Vickey from Kansas for making one the night before so we could decipher the pattern. It had a couple of mistakes in it.
Below our pix, I've copied one off the internet that explains it well and shows step-by-step pix. Her last paragraph is very important.
It's very important that fabric, batting, and thread are all 100% cotton for microwave safety.
.jpg) |
| our tater bags - Gus will get my Longhorn bag |
 |
| back row: Shirlene, Dee, Vickey, Darlene, Connie front row: Kathy( this was her first sewing experience) and Jerri |
.jpg) |
| Dawn rec'd my 2nd try |
Quick and Easy Tater Bag Pattern!
I am finally posting our first FREE Pattern! Have you heard about the Tater Bags? These little quilted wonders perfectly cook your taters in the microwave in no time!
Cutting Instructions:
Outer Bag - Cut one 11" x 21" piece of fabric
Lining - Cut one 11" x 21" piece of fabric
Warm Tater Batting - Cut one 11" x 21" piece
**You don't have to use different fabrics for the outer bag and lining. You may decide to use the same fabric. If so, just cut two 11" x 21" pieces of the same fabric.
Next, layer your fabrics RIGHT sides together and put the batting on top.

Pin all three layers along the 11" side. Please note...in the picture below the batting is on bottom for picture purposes only. You will want to have the batting on top when you sew this together. Otherwise, your batting may stick to your feed dogs.

After you sew both 11" sides, you will turn your fabric sandwich RIGHT sides out. The Tater Batting will now be on the inside with the RIGHT sides of your fabric showing.
Topstitch 1/4" from the end on both 11" sides.

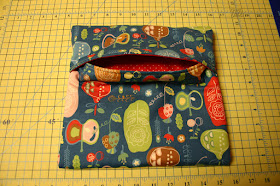
Now we're ready to sew up the side seams. Make sure the lining fabric is on the outside when you fold up your bag to sew the side seams. In the pictures below, you see the red polka dot fabric folded over. That will be the inside of my bag.
You need to fold the short flap first. I folded mine down about 3.5" and pinned it in place.

Then fold up the bottom flap. This flap should overlap the 3.5" flap by 1" and pin in place.

You can see I used my 6" x 24" ruler to help me get a good fold and to keep the fabric from buckling on the inside.
Now you are ready to sew up those side seams. I went over mine twice just to make sure it holds. You could also use a serger. The last thing you need to do is flip your bag right sides out.
You can see my red polka dot fabric peeking out in the below picture.
Please make sure you always watch over your tater bag in the microwave. Do not leave it unattended. A large potato will cook in about 3-5 minutes. I always keep an eye on mine because they can overcook before you know. Oh, I also wrap my tater in a paper towel then stuff it in the bag.
Cutting Instructions:
Outer Bag - Cut one 11" x 21" piece of fabric
Lining - Cut one 11" x 21" piece of fabric
Warm Tater Batting - Cut one 11" x 21" piece
**You don't have to use different fabrics for the outer bag and lining. You may decide to use the same fabric. If so, just cut two 11" x 21" pieces of the same fabric.
Next, layer your fabrics RIGHT sides together and put the batting on top.

Pin all three layers along the 11" side. Please note...in the picture below the batting is on bottom for picture purposes only. You will want to have the batting on top when you sew this together. Otherwise, your batting may stick to your feed dogs.

After you sew both 11" sides, you will turn your fabric sandwich RIGHT sides out. The Tater Batting will now be on the inside with the RIGHT sides of your fabric showing.
Topstitch 1/4" from the end on both 11" sides.

Now we're ready to sew up the side seams. Make sure the lining fabric is on the outside when you fold up your bag to sew the side seams. In the pictures below, you see the red polka dot fabric folded over. That will be the inside of my bag.
You need to fold the short flap first. I folded mine down about 3.5" and pinned it in place.

Then fold up the bottom flap. This flap should overlap the 3.5" flap by 1" and pin in place.

You can see I used my 6" x 24" ruler to help me get a good fold and to keep the fabric from buckling on the inside.
Now you are ready to sew up those side seams. I went over mine twice just to make sure it holds. You could also use a serger. The last thing you need to do is flip your bag right sides out.
You can see my red polka dot fabric peeking out in the below picture.

Please make sure you always watch over your tater bag in the microwave. Do not leave it unattended. A large potato will cook in about 3-5 minutes. I always keep an eye on mine because they can overcook before you know. Oh, I also wrap my tater in a paper towel then stuff it in the bag.
No comments:
Post a Comment