Wednesday, January 22, 2014

Framed!

And buttoned!

1-22-14:  Dawn came up with a great idea for today's craft at JCRV.  We took inexpensive picture frames and gave them some bling!  We used beads, buttons, and hot glue.  Soooooo easy and fun!  Great gift idea!

Mine are extra special because they are decorated with some of the hundreds of buttons Grandma Mac had saved!

I used Wanda's buttons to give Rocky some bling
finished products on the mantle
Connie, our craft leader, giving the instructions
Jerri buttoning up
Shirlene finding her pink!
me showing off my 1st try at fingerless mittens in between frames
close up
everyone's was a little different and they were all great!
made a few extra for some McClintock's
craft class at the library in Kerrville
 2-20-14:  Sarah invited me to lead the Feb craft class at the Kerrville library.  So I chose the deco frames.  These ladies were sooo creative and seemd to enjoy themselves.  I had a blast!


the library director, Laura
Laura squeezed in some time to decorate a frame for herself

newspaper lady, Bonnie, checking it out
finished products!


10-18-14:  Sherry Stone came out to the clubhouse at Shady Pines to have a little craft time with me. She and I are always looking for a fun and easy Christmas gift idea.


her finished product
 
I made another from Wanda's black and yellow buttons

Yarn wreath


Dawn and I spotted this wreath at The Tinsmith's Wife in Comfort.  Great stashbuster.  Can't wait to make one.

my yarn wreath
Finally made my wreath on 3-9-14.  I made a much smaller version because I have much smaller walls!  I cut up a clothes hanger to make it smaller.


 It took a lot of dabs of hot glue and a few neat pins. These are just some of the small remnants of my yarn and some straight needles which I never knit with.  Good use for them. :)

I think I might go back and glue on a skinny cardboard ring to the back to hold the yarnballs still.

fabric wall hangings

Our inspiration at Creations in Kerrville
Jerri, Dee, Dawn, and I stopped in Creations on our way back from the yarn shop.  We were pretty inspired by these fabric "paintings" they had hanging on the wall.  So I bought a panel, which had 6 pics on it.  I used foam board and taped it on the back with clear packing tape. They weight nothing (perfect for rv'ers) and look great.  Next week in crafts I think the girls will do this craft and maybe add a button design on them.

So I got some foam board and a panel and made my own
kept the hooter for the camper
gave Sarah the cat for her belated bday
Gus will get a Longhorn pic
a touch of chevron burlap for the camper -- I may add buttons and a bow
Batik with lots of Wanda's buttons

1-29-14:  Today in crafts we made some more!  Below are some pix.

Dawn's beautiful panel

Shirlene and Connie with Shirlene's owl
Dawn's tree?
Dawn decided she wanted to do a tree like mine.  She was sooooo excited!  The 5 minute procedure went something like this:  " I love it! I am going to do one just like it.  It's great.  This is so easy.  D*#n.  This is hard.  This is ridiculous.  Ouch!  Hot glue doesn't taste good.  I'm finished.  I'll work on it later."

LOVE what Jerri did with a batik fat quarter!


Saturday, January 18, 2014

Raisin Scarf


found this free pattern on ravelry.com.  mucho easy!


instead of casting on 20, i did 30.  love this pattern and i think it'll be great with several types of yarn!

got this yarn at tinsmith's wife in comfort, tx.  very reasonable and feels great! COtton, BAmboo, SIlk.

Thursday, January 16, 2014

Fabric Infinity Scarf


I gave this one a twist before joining -- mobius style
Finally tried this super simple infinity scarf.  My pix will prolly only be helpful to me, but you can google and get instructions that may make sense to you.  Love the idea and will def be making more! This is about a 30 minute project.

I do wash, dry, and iron fabric first.  Even it up on your cutting mat. Then cut it however long and wide you want yours to be. I would suggest buying a yard.


Press the short ends about a quarter to half inch down to provide a hemmed-look edge.  Fold inside out in half lengthwise. Sew 1/4 to 1/2 inch seam lengthwise.

Flip right side out.


Pin short ends together in a circular manner.  You can only pin to a certain point.  Then begin stitching this together on your machine.  Again, you can only sew so far because it becomes too tight.  Stitch as far as you can and remove from machine, hand stitch the rest.


Flip that part over and you've got yourself a scarf!  I think a pretty pin would be a nice accent.


Tater Bags

2-2-14 WARNING: the tater bag that Vera made for me caught on fire in the microwave the other day after several successful uses.  yikes! Some of the experts told me it could've been that there was something that wasn't 100% cotton in it (thread, batting, etc), or there could've been a little food on it.  Sooooo, never leave unattended! Microwaves are also different -- some hotter than others.  


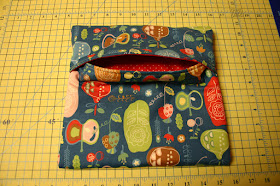
1-15-14:  The girls made Tater Bags today in crafts at JCRV. Last year Cliff was going to give us a demo in crafts for this, but we ran out of time.  One of my workamper friends in Branson, Vera from Michigan, gave me one along with the pattern a couple of summers ago.  So this year my winter peeps and I got together and made them.  A huge shout out to Vickey from Kansas for making one the night before so we could decipher the pattern.  It had a couple of mistakes in it.  

Below our pix, I've copied one off the internet that explains it well and shows step-by-step pix.  Her last paragraph is very important.

It's very important that fabric, batting, and thread are all 100% cotton for microwave safety.


our tater bags - Gus will get my Longhorn bag
back row: Shirlene, Dee, Vickey, Darlene, Connie
front row: Kathy( this was her first sewing experience) and Jerri
Dawn rec'd my 2nd try

Quick and Easy Tater Bag Pattern!

I am finally posting our first FREE Pattern!  Have you heard about the Tater Bags?  These little quilted wonders perfectly cook your taters in the microwave in no time!

Cutting Instructions:
Outer Bag - Cut one  11" x 21" piece of fabric
Lining - Cut one 11" x 21" piece of fabric
Warm Tater Batting - Cut one 11" x 21" piece

**You don't have to use different fabrics for the outer bag and lining.  You may decide to use the same fabric.  If so, just cut two 11" x 21" pieces of the same fabric.

Next, layer your fabrics RIGHT sides together and put the batting on top.


Pin all three layers along the 11" side.  Please note...in the picture below the batting is on bottom for picture purposes only.  You will want to have the batting on top when you sew this together.  Otherwise, your batting may stick to your feed dogs.  


After you sew both 11" sides, you will turn your fabric sandwich RIGHT sides out.  The Tater Batting will now be on the inside with the RIGHT sides of your fabric showing.

Topstitch 1/4" from the end on both 11" sides.


Now we're ready to sew up the side seams.   Make sure the lining fabric is on the outside when you fold up your bag to sew the side seams.  In the pictures below, you see the red polka dot fabric folded over.  That will be the inside of my bag.

You need to fold the short flap first.  I folded mine down about 3.5" and pinned it in place.


Then fold up the bottom flap.  This flap should overlap the 3.5" flap by 1" and pin in place.


You can see I used my 6" x 24" ruler to help me get a good fold and to keep the fabric from buckling on the inside.

Now you are ready to sew up those side seams.  I went over mine twice just to make sure it holds.  You could also use a serger.   The last thing you need to do is flip your bag right sides out.

You can see my red polka dot fabric peeking out in the below picture.  


Please make sure you always  watch over your tater bag in the microwave.  Do not leave it unattended.  A large potato will cook in about 3-5 minutes.  I always keep an eye on mine because they can overcook before you know.  Oh, I also wrap my tater in a paper towel then stuff it in the bag.

Monday, January 13, 2014

Owlings


Dawn surprised me with these beautiful fingerless mittens!  Can you see the owls in them?


I think she may have inspired me to give this pattern a try.  "Owlings" can be found on ravelry.com.

mine and Connie's
Dawn taught Jerri and me how to do them!

1-19-14: Yay!  This is my very first cable project!!  Dawn taught Jerri and me how to do this today.  She is such a good teacher.  Of course, my finished product has a few mistakes.  But I will be trying it again now that I have the hang of it!!


2-10-14:  Finished!!  I'll have to give these to someone who likes me a lot.  Cuz there are crazy mistakes that I didn't see til I finished.  For instance, see the wrist areas?  On one I evidently put it down awhile and picked it back up on the wrong side.  Looks kinda cool (the one of the left) cux it's like a little ruffle.  But it's completely different from the other.  One would be purled and the other knitted.

The Shepherd's Wool that Dawn gave me for these feels great and is made in Brighton, Michigan -- her hometown.  This is also the official wool for this year's Winter Olympics sweaters!

Lulu and her new owlings

3- 2-14:  Laura Lee rec'd the owlings I knitted and seemed to really like them!  That makes me happy when someone I love likes what I made!  :)  And they look great on her petite little hands!


January 2016:  Got motivated to make some more of these after Dawn gave me a pattern that gave me some more cabling practice. Other than one of the thumb gussets being upside down, I was happy with how the above turned out. I think this may be the year some of my peeps get these for Christmas.


Laurie Tullos' and Lacey Goff's

November 2016:  Made some more for this Christmas